As part of the Design For Print brief, we have to learn new skills and try some processes out. I decide to organise a Bookbinding Induction as I have never done this before and would be good primary research for my brief.
In the Induction, we decided to learn a range of basic binding techniques so that we could get the most out of the time we had. The techniques were:
- Pamphlet Stitch
- Concertina Bind
- Japanese Stab Binding
This would give us an array of techniques which we can put into practise if we produce any books. Plus, this would give us a skills which we can use for future projects.
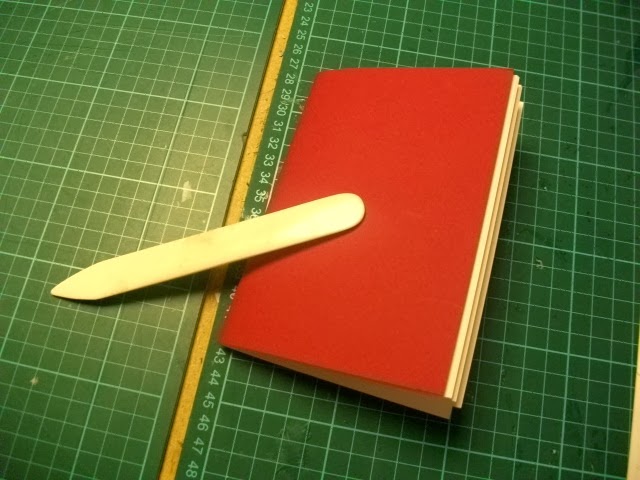
Pamphlet Stitch:
We used 5 pieces of A5 Cartridge Paper and 1 Piece of Coloured Paper.
 |
| Folding Paper |
The grain of the paper will determine the way that the book is physically folded as the paper needs to be folded to make a spine. You can tell which way the paper grain goes as it is whichever way the paper bends naturally and easiest. Fold the paper in half and smooth out using a Bone Folder. When folded, you will have extra paper spilling out over the sides.
 |
| Holes in Spine |
You then poke 3 holes into the spine of the book; 1 in the middle and 2 on either side
 |
| Pamphlet Stitching |
With the string, you sow from the middle of the book, through the middle hole and out, then through one of the side holes in the outside, back to the empty hole and then back through the middle but from the outside to the inside. You then tie a double knot in the middle of the book and cut off the excess.
 |
| Trimming the Sides |
Using a scalpel and ruler, trim down the top, bottom and side so that the paper sizes are of equal length.
 |
| Round the Edges off |
You can either keep the book edges square and straight or you can round off the edges of the book by using the Corner Rounder machine. This produced a little, quaint notebook which, if you were to produce a book of work with, would need at least a 5mm bleed on it.
Concertina Bind:
We used 7 pieces of Cartridge Paper- it is important that you use an odds number of papers so that you have a front and back.
 |
| Folded Paper |
The bind is to be made out of single sheets of paper so that they fold out separately and all the pieces of paper need to be trimmed to the same size as each other and then folded in half.
 |
| Arranging the Papers |
Mark off each side of the piece of paper with a mark so that you can follow it later on. Then arrange the separate pages back to back in a V shape pattern. Put them all together and clamp together with a clip.
 |
| Creating the Concertina |
Using PVA Glue and spreaders, glue the pages together using the marks you made earlier as your guide. If a mark is showing, glue it. If its not showing, leave it. Turn the paper around and do the same. Unclip the side and clip on the opposing side, going through the same process of Gluing again. This will create the concertina shape by sticking the pages together.
 |
| Sticking Pages Together |
We then took a piece of similar sized mount board and uses it to bookend the concertina while it was put in the Nipping Press in order to dry as well as pressure the glue to stick to the pages securely.
 |
| Board for Ends |
Using a 2.5mil Grey Board for the ends, take a large piece and measure to size of the concertina pages, making sure to leave a border of about 2-5mm. Draw and cut down using the Ruler and Scalpel.
 |
| Measured Buckram Covers |
In order to make a visually pleasing front and back cover, we were to cover our boards with Buckram. Buckram is a fabric stock which is used to cover boards to produce a clean and durable, hard-wearing cover for books. The Buckram is cut in half making sure the pieces are 2 rulers length apart and the boards are drawn around in white pencil.
 |
| Glue Buckram to Boards |
After drawing round it, put a large coating of PVA Glue on the board and stick it to the Buckram. Stick down, turn it over and smooth it over using the Bone Folder, making sure to get the surface area and the edges so that it sticks on all sides.
 |
| Glue sides of Buckram |
Cut down the edges on each side but so that a gap of 3mm is present and glue the sides down to the back of the Board. Glue the long sides first and the short sides afterwards so as to make the edges neat and tidy. Tightly pack the sides when pulling them over and tuck the corners in to make them neat.
 |
| Attach the Concertina to the Book Ends |
Empty the Concertina from the Nipping Press and glue the end papers using PVA Glue and a Spreader, making sure to cover the rest of the papers in newsprint to make sure they don't get covered in Glue. The Glue needs to have a nice smooth layer which is evenly distributed, applying it outwards in the shape of a star. After Gluing, pick up the papers and line it up before sticking it to the book ends. Smooth down with the Bone Folder.
 |
| Concertina Bind |
When you have done both sides, put it back into the Nipping Press to let it dry and stick properly. This is a great way of producing Double Page spreads of work which can be displayed in a professional way.
Japanese Stab Binding:
The reason for the naming of this Binding is that you stab the paper to create the holes in the pages. You use single sheets of paper which you trim beforehand as you can't trim it. Generally, when you are making a book in this way, you need to take into account the fact that this style of stitch is difficult to bend the pages so you need at least a 1.5cm margin.
 |
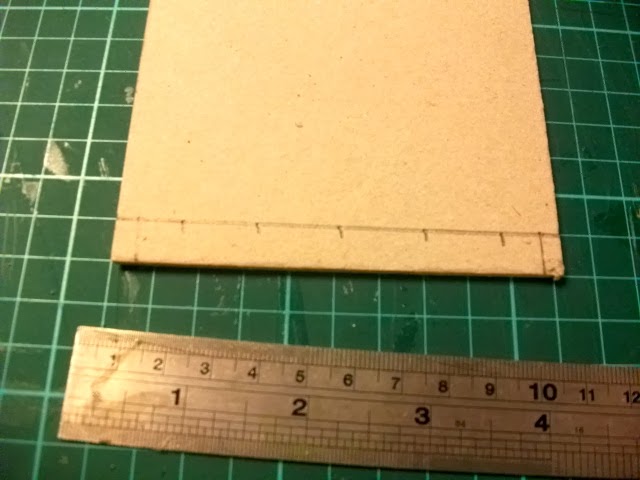
| Trim Board to Paper Width Size |
Take the separate pages and 2 coloured pages for ends and measure them against a piece of board. Trim it down so that it is the same width size as the pieces of paper.
 |
| Measuring/Aligning the Dots for the Holes |
Using the board, measure half a centimetre on the width and 1cm in height and draw a line across. From the half centimetre marks, mark a dot 1cm away from each. From there, draw a dot in the middle of them and then dots in-between, making a total of 5 dots.
 |
| Drilling the Holes |
Due to the fact there was only a small number of us, we got to use the drill to make the holes into our paper, clamping the paper down, lining the holes with the drill and putting the drill through.
 |
| Trimming Sides with Pamphlet Stitch |
After drilling, remove the board and do a Pamphlet Stitch using the middle and outside holes. This will allow you to keep the pages together as you trim the paper sides using a Ruler and knife to make them even. After trimming, cut the Pamphlet stitch off the paper to make room for the Japanese Stab Stitch.
 |
| Beginning of Stitch |
Start by threading your needle through the second from end hole from the inside of the book, leaving some string sticking out of the book which will be used later on.
 |
| Completed 1st Hole |
From this, thread the needle over the top of the hole and through to the other side. Move to the hole next to it and do the same, making a sort of U Shape with the thread- follow this pattern until you get to the end.
 |
| Going to the Other Book End |
At the end of the row, go around the end to the hole at the other side before going over the top. Then go back on yourself to the opposite end of the book by threading the needle through the places which are empty and do the same at the other end.
 |
| Finishing off Stitching |
At the last hole, angle your needle to get through to the middle of the book where you started with the left over string. Tie the 2 pieces of string together to make a double-knot and cut off with 1cm to spare which you can tuck into the spine with your needle. Even though I got confused with the Stitching, this book came out the best as my trimming with the knife and Ruler was much more precise with the practise I had from the past 2 books.
 |
| 3 Books Made in Induction |
Overall, I really enjoyed my induction into Bookbinding as I felt that it was great that I had something physically made to show for my time in the Print Room. I personally love sketchbooks and notebooks so it is very tempting for me to go ahead and make my own to use in the future. Its also great that this is a skill that can be transferred to any Brief. This is the Induction that I've enjoyed the most since I been at LCA so much so that I asked if there is any room in the next one- there isn't and I'm not surpassed as it's such great fun.


No comments:
Post a Comment